Automatic Model-Based Image Segmentation and Labeling
Richard Bragg
Background & Context
While current approaches to motion analysis are valuable to obtain sensitive, quantitative, kinematic and kinetic measurements, most are limited to a laboratory environment in which a subject must wear reflective markers fixed to relevant anatomical landmarks, and perform activities on a force plate. These restrictions can affect a subjects comfort, which may result in data that differs from natural motion. Additionally, the environment makes it difficult to accurately reproduce sports activities. Clearly, there is a need for a method in which researchers can obtain both kinematic and kinetic quantities for human motion in an arbitrary setting without markers or force plates. The purpose of Project Mothra* is to achieve this goal.
A logical approach to calculate the forces and torques associated with human motion obtained from video data is to match a subject-specific, 3-dimensional model to the recorded motion. If inertial properties are then associated with each limb segment in the model, it is possible to use inverse dynamics to calculate kinetic quantities without a force plate. Clearly this is a considerably large undertaking, and accordingly Project Mothra has three distinct areas of development: 1) an application for building 3-dimensional, subject-specific models, 2) a model-based visual tracking algorithm, and 3) a dynamics engine to calculate the kinematics and kinetics of the observed motion. Since this class focuses on computer vision techniques, it was natural to choose some subproblem from the second area as my final project. That said, an understanding of the general algorithm for the model-based visual tracking is essential to further define the context of my project.
To make the tracking problem more tractable, our subjects must wear a multicolored suit (Figure 1). This way, we can use color segmentation to help disambiguate the limb segments, which will help in the pose determination of the kinematic model during motion sequences. In order to segment an image sequence using the colors from the suit, a reference image is used to define the color spaces for each body segment. Currently, it is necessary to manually define the regions of interest (ROIs) in the reference image by clicking at the vertices of a polygonal region for each segment, and then specifying which body part the selected region represents. This procedure can not only be tedious and difficult, but unreproducible. For instance, it is especially difficult to specify homogeneously colored regions on the legs, since the patterns are not solid, in order to facilitate more accurate tracking of the lower segments. Clearly, it would be useful to automate the procedure for segmenting and labeling the reference image, which is the purpose of this project.
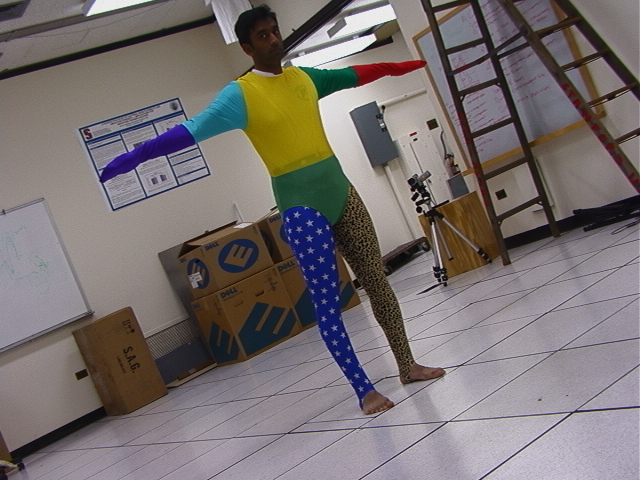
Figure 1. The multicolored "Mothra" suit in the reference
position
*Important side-note: The name Mothra was chosen for several reasons. Mothra is a huge moth who defends humans against tyrannical monsters, such as Godzilla. Mothra's size is analogous to the magnitude of this project. Mothra's top speed is similar to that of the eventual speed of the calculations. Like Mothra, the project will have many special "powers". For instance, Mothra's psychic power is much like the ability to obtain force measurements without the benefit of a force plate. Finally, Mothra has extremely colorful wings, much like the multicolored suit shown above. The similarities are striking, thus making Mothra the natural and obvious choice as a namesake. For more information on Mothra, visit my Mothra webpage.
Goal
As stated in my proposal, the goal for my final project is to write a MATLAB program that takes an image of a subject wearing the multi-colored suit while standing in the reference position (as shown in Figure 1), and segments the image into labeled ROI's corresponding to the differently colored body segments. The solution will use a segmented body model, but will not rely on manual initialization/labeling of the color spaces. Later, this will be used as the initialization frame in tracking the subject through various arbitrary motions.
Approach
I spent a great deal of time determining the best approach to this problem. For my research paper, I read many articles about different approaches to using 3-d models to track motion sequences, and it seemed that just about any of them could work. Finally, I decided to use the approach used by Gavrila and Davis [1], since it had some decent results, and the algorithm seemed relatively straightforward. Their approach is based on a generate-and-test strategy, and the problem is formulated as a best-first search problem that attempts to find the pose parameters whose synthesized appearance is most similar to the real human. To make the 22-DOF search space tractable, it is decomposed into 3 smaller search spaces: the first attempts to pose only the torso of the subject, followed by the arms, then the legs. The position of the torso in the first frame is initially determined using a bootstrapping procedure that determines the major axis of the body using an iterative PCA technique. Similarities between a model pose and a real image are evaluated by edge detection followed by a technique called chamfer matching, which is based on summing the between the points in a test set and the points in a reference set.
As I began to implement their procedure using a 3-d model from a model building application that I have been developing, I came to an important realization. The goal of my project was not actually pose determination, but instead segmentation and labeling of a 2-d image. Furthermore, we know the (approximate) colors of the suit that the subject will be wearing, and the (approximate) pose that the subject will be in. Clearly, the problem is much simpler if I just use that information. With this realization, my approach changed dramatically for the better. Why bother with fitting the 3-d model when there was so much available information to make the problem much simpler? Instead, I decided that I could probably converge on the color space by modifying the EM algorithm [2] to start with initial guesses in color spaces that were near the colors of the suit, and then use only the connectivity of the regions to label them. Of course, there were some snags along the way, but this procedure is the skeleton of what turned out to work, and work quite nicely... In the next section, I will explain how the finished product actually works.
Algorithm
Step 1: Background Subtraction
In order to make the solution more robust, and to ensure convergence of the EM segmentation, it seemed reasonable to first eliminate the background of the image. While this would most likely not be necessary if we used a solid colored background screen, which could be easily removed by the segmentation, we have a rather cluttered background that cannot be easily dealt with in that way. In some ways, adding a background subtraction step made the solution slightly more complicated, since now it requires both an image of the subject in the reference position and an image of the background without the subject. However, the added complication in requiring a background image is a small price to pay for the robust solution that it provides!
The background subtraction algorithm that I use proceeds as follows: First, I compare each pixel in the image with the subject and the background image, and throw all of the pixels whose rgb values are the same (or at least within a low threshold) in both images. This leaves a large region where the subject is standing, but also some noisy smaller regions caused by shadows or discrete pixels. To address this, I remove all regions that are smaller than a specific threshold, which, ideally and practically, leaves only those region(s) that are from the subject. Finally, if there are any "holes" in these regions, which can happen if the a background pixel is close in the color space to one of the subject's pixels, these are filled in. The result is the right image in Figure 2.
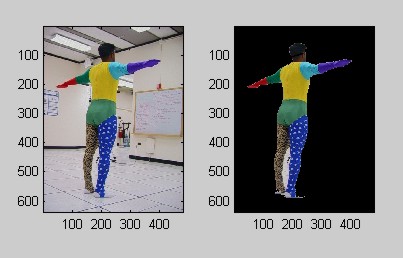
Figure 2. Initial Background Subtraction
Step 2: Modified EM Segmentation
For Homework 2, we were asked to implement the EM algorithm [2] in which
the means were initialized using the total sample mean plus some random
noise. Additionally, we assumed that each color layer had equal prior
probabilities. In this case however, we have a priori knowledge of
both the approximate colors that we expect to find in the suit and the
approximate relative sizes of the body segment regions. Clearly this
can be used to improve the chance of useful convergence of the EM algorithm.
With this in mind, I chose the initial means and priors shown in Table
1.
|
|
|
|
|
|
|
|
|
|
|
|
|
|
|
|
|
|
|
|
|
|
|
|
|
|
|
|
|
|
|
|
|
|
|
|
|
|
|
|
|
|
|
|
|
|
|
|
|
|
|
|
|
|
|
|
|
|
|
|
|
|
|
|
|
|
|
|
|
|
|
|
|
|
|
|
|
|
|
|
|
|
|
|
|
|
|
|
|
|
|
|
|
|
|
|
Obviously, this does not stand without a bit of explanation. As you can tell these initial color values are pretty general, as they should be to allow for different lighting and background conditions. Similarly the prior probabilities would clearly vary depending on the camera distance and angle. Fortunately, however, the EM algorithm only uses the means as initial values, and the priors as relative weights. Obviously, I didn't want to have to choose the colors based on the specific image I was working with, or else the problem would end up being a manual problem every time, which was what we were trying to avoid in the first place. Instead, I chose these initials colors by comparing the colors of the suit with colors on a color wheel and chose these as the initial values, in hopes that they would be close enough to each color that the EM procedure would converge on the proper color spaces regardless of the specific lighting conditions.
Initially, I had several concerns with this procedure. First, I didn't know if the skin color I chose would be able to converge on the many different skin tones that a subject might have. Second, I didn't know if the white region would be able to pick up the miscellaneous undesired pixels, such as those you see between the subject's legs in Figure 1. Finally, I didn't know for sure that the different greens and blues would converge to different distinct layers. It turns out that all of these concerns were taken care of, as you will see below. In the cases in which the greens and blues (and even the skin and brown layers) converged unexpectedly to the opposite of my intentions, the labelling step (below) was able to sort out these discrepancies. The white and black layers were always successful in picking up any undesired background pixels, although this is most likely because the background is mostly black and white. Interestingly, the priors had no effect at all on the converged solutions, so my final implementation does not include these to improve the speed. The results of the EM step for the image from Figure 2 is shown in Figure 3. (Note: Once the EM algorithm was applied, the resulting layers were "cleaned up" by throwing out any pixels that weren't part of any large regions in the layer.)
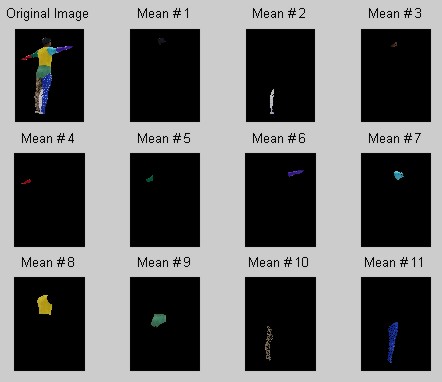
Figure 3. Results of EM Step
Step 3: Labeling the Regions
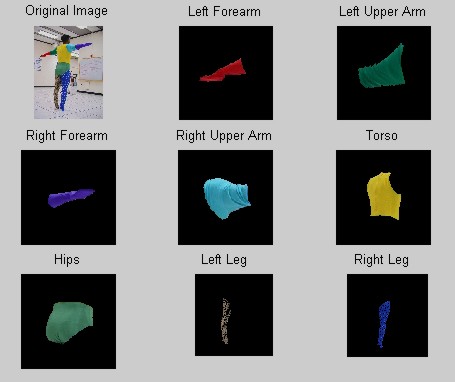
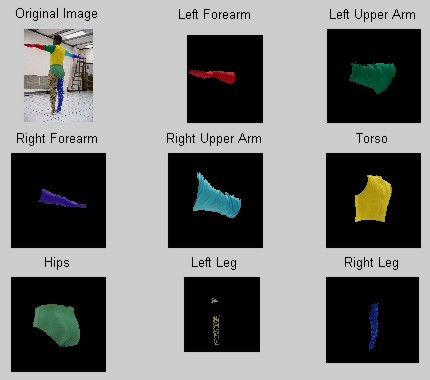
Although the initial values used for the EM algorithm give us a good idea of which layers will be which body segments, a robust solution does not rely on that to label the different regions. Instead, we can use knowledge of the connectivity of the model to determine which layers are which. I do this as follows: First, I discard the first two layers (black and white) since they should never converge to the color spaces we are interested in. Then, to determine whether the subject was facing the camera or had their back to the camera, I used the position of center of the bounds of the red layer (which should always be the left forearm since nothing else is even close to the red colorspace) compared to the other layers. Using the position of the left forearm and the facing direction of the subject, I can traverse to each region using their relative positions, and check to make sure it is not far from the initial color value of the body part it should have been, labeling each region as we go. Once the layers are labeled and sorted into their desired regions, any "holes" in the solid colored regions are filled in. This step is not done for either of the legs, since we only want the pixels that contain the dominant color (brown and blue, respectively). This labeling procedure turns out to be extremely effective, as you can see in Figure 4.
Figure 4. Labeled Results
Results & Evaluation
The output of my program is the eight binary images corresponding to the eight different colored body segments of the suit, and the labels of those binary images. It also displays the summary image shown in Figure 4 above. Clearly the segmentation works great, and the labeling is correct. All that remains then is to test the solution and compare the results using different camera angles and subjects. Also, since the ROIs that I find and label are ultimately used as input for the motion tracking algorithm, we can compare the results using my automatic segmentation and labeling to one done by hand.
Robustness
Test 1: Camera Positions and Backgrounds
The first and most obvious way to test the robustness of my solution was to segment and label some images taken from different camera locations and backgrounds. The only obvious constraint was that the camera had to be stable between the subject image and the background image to ensure that the background subtraction worked properly. Figure 5 shows that the program works quite well for other camera positions and backgrounds. I wanted to try some outside to get very different lighting conditions, but unfortunately none of my subjects were willing to wear the colored suit outside the lab!!
 .
.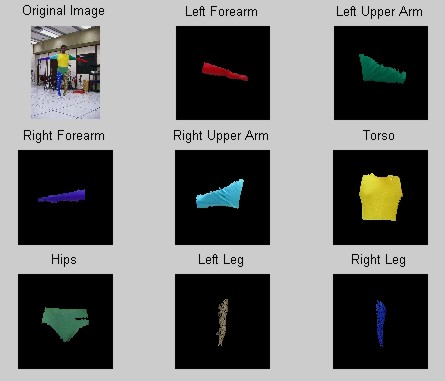
Figure 5. More Segmentation and Labeling Results
Test 2: Subjects
Another point of concern was that the skin layer may not converge properly for people with varied skin tones. So far, all of the images I have shown have had a subject with a relatively dark complexion. Figure 6 shows that it works equally well for a subject with a more fair complexion. The only problem with this segmentation is that it thought his feet were part of his left leg, due to their similar colors. I have two solutions for this problem - either the subject must wear socks, which will become part of the white layer that I discard, or I could add another layer to pick up the feet, since most peoples feet have a different complexion than their face. One thing is for sure - our next suit will not have any colors that could be confused with skin!
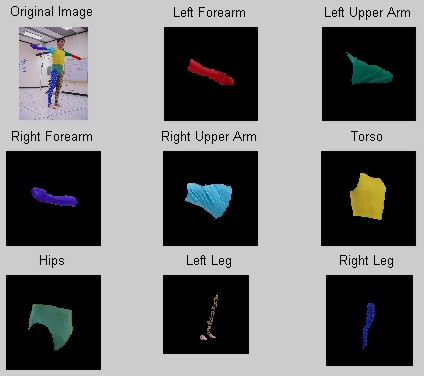
Figure 6. Segmentation and Labeling for a Fair Skinned Subject
Test 3: Pose Variation
While I was completely confident that the algorithm would work well for a subject in the reference pose, I could test it further by seeing if it worked on a slightly different pose. I chose an image that still showed all of the body segments pretty clearly, and sure enough, it still worked pretty well, except for the same feet problem that we had above (Figure 7).
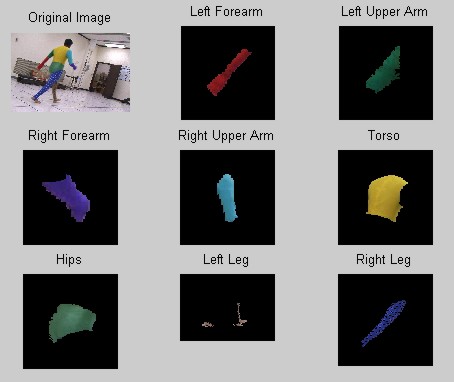
Figure 7. Segmentation and Labeling for a Moving Subject
Comparison with Manual Segmentation
The final evaluation I needed to do to prove that I was satisfied with my solution was to compare the results I obtained using my automatic segmentation to a manual segmentation, and to see how that affected the color-based motion tracking. These movies demonstrate that the tracking performed using my automatic segmentation algorithm is virtually indistinguishable from the manual segmentation results, which is clearly a desirable result! Note: I make no claims about the quality of the resulting movie segmentations, since this tracking part is not yet a finished product, but I show these only to illustrate that the automatic segmentation works as well as the manual segmentation for initializing the color spaces.
1. Walking/running subject:
Original sequence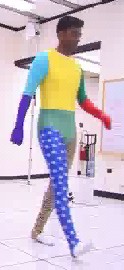 Manual
segmentation
Manual
segmentation  Automatic
segmentation
Automatic
segmentation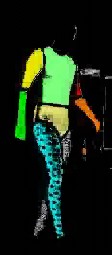
2. Sliding subject:
Original sequence Manual
segmentation
Manual
segmentation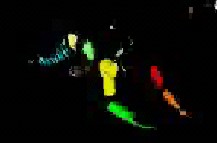 Automatic
segmentation
Automatic
segmentation
Limitations & Assumptions
Now that I have adequately extolled the virtues of this automatic segmentation
and labeling program, it is time to discuss its shortcomings, limitations,
and assumptions:
- It works only for this suit, although modifying it for another suit
would only require the initial color spaces to be changed to the colors
of another suit.
- All of the background was easily discarded in the segmentation as
it was, but this was probably facilitated by the fact that most of the
background was black and white. A colorful background may have caused
problems by intruding on the color spaces of the body segments
- The subject must be standing upright with all limbs visible and the
arms extending out from the body. Although this seems like a limiting
assumption, we intend to use this only for subjects in the reference position,
so this limitation is not really a problem
- A couple of segmentations actually included the feet with the left
leg. This would not be a problem if the subject wore socks, or the
left leg were colored differently
Conclusions - Compare to Best/Worst Outcomes
Although my approach turned out to use less of the 3-d model than I initially anticipated, it turns out that my solution is not only much simpler, but it works extremely well. In my proposal, I said that the best outcome would be: The algorithm works for all subjects in any orientation towards the camera, and segmentation is perfect with no background noise or incorrectly identified regions. Based on this, I would have to consider this project an unqualified success!
Future Work
There is still a ton of work to be done in Project Mothra. Obviously, once the color segmentation of the entire movie sequence is complete, we will need to use this information to pose our 3-d model at each time step. This pose determination problem will likely use an approach similar to that of Gavrila and Davis [1], but will also use the color information for faster convergence and easier identification of the body parts. Even when this is done, there is the dynamics problem that will use the pose determinations to calculate forces and torques - our eventual goal. This project was really only a small piece of the big picture, but useful nonetheless in streamlining the overall process.
References
1. D.M. Gavrila & L.S. Davis. Tracking of human in action: a 3-D model-based approach. ARPA Image Understanding Workshop, Palm Springs, CA (1996).
2. J.A. Bilmes. A Gentle Tutorial of the EM Algorithm and its
Application to Parameter Estimation for Gaussian Mixture and Hidden Markov
Models. UC Berkeley TR-97-021 (1998).